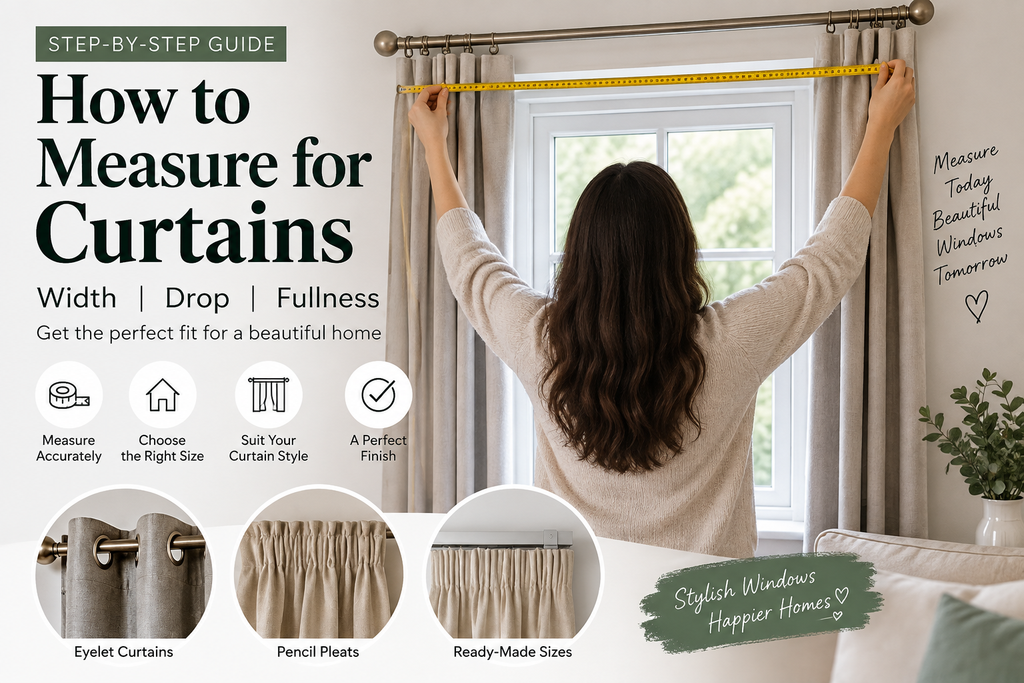
Measuring for curtains is easier once you separate three measurements that are often confused: the window width, the pole or track width, and the curtain’s flat fabric width.
For an existing installation, start by measuring the usable width of the pole or track rather than only the window opening. Measure a pole between its decorative finials or measure the usable track length. Then measure the curtain drop from the hanging point appropriate to your chosen heading to the sill, below the sill or floor. Current UK retailer guides use this same hardware-first principle.
What You Need Before Measuring for Curtains
Use a rigid metal tape measure where possible. A soft sewing tape can bend, stretch or sag across a large span.
You will also find it useful to have a pencil, notes on your phone or paper, and—if you are planning new hardware—a spirit level.
Use a suitable step stool only where necessary and avoid unsafe reaching.
Do You Already Have a Curtain Pole or Track?
This is the first question to answer.
If the hardware is already installed, measure it.
If no hardware is installed, decide where your pole or track will sit before ordering the curtains.
Installing or at least planning the hardware first gives you a fixed width and drop instead of making you guess from the window alone. Both Jane Clayton and John Lewis recommend establishing the hardware before final curtain measurements where possible.
How to Measure Curtain Width
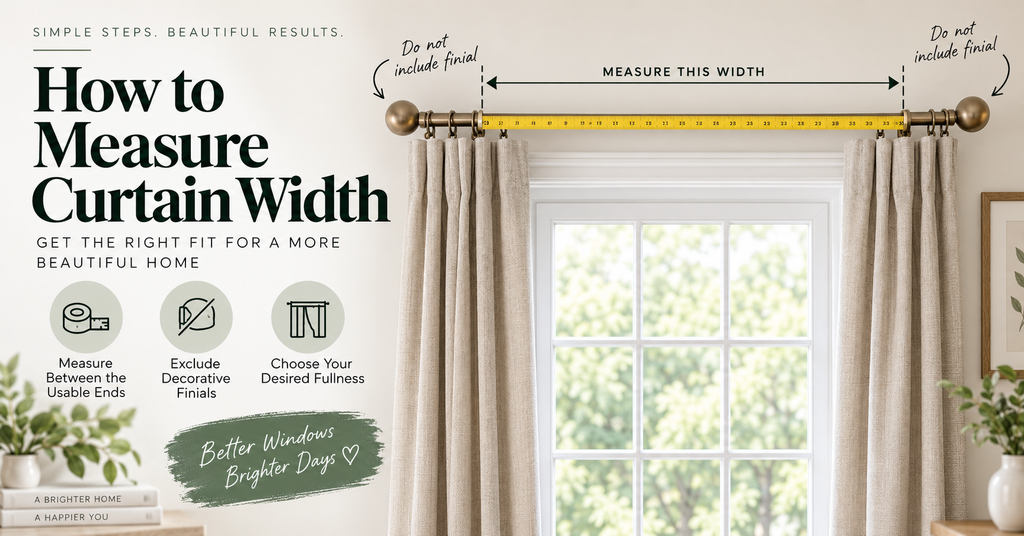
For an existing curtain pole, measure horizontally between the finials. Do not include decorative end pieces because the curtains do not normally travel across them.
For a straight curtain track, measure its usable end-to-end length.
A centre-overlap track, curved track or track with returns can require extra measurements. In those cases, use the track manufacturer’s or curtain supplier’s instructions.
The important principle is simple:
Pole/track width is your base coverage measurement.
It is not necessarily the same as the total flat width of curtain fabric you need.
Example
Suppose the pole measures:
200 cm between the finials
The base coverage width is therefore 200 cm.
Buying only 200 cm of completely flat curtain material could produce little or no gathering. The actual flat curtain width depends on fullness and heading construction.
What Is Curtain Fullness?

Fullness describes how much flat curtain material is used compared with the width it covers.
A curtain wider than its pole or track can form folds, gathers or pleats when closed.
A simple planning formula is:
Total flat curtain width = pole/track width × target fullness
For example, if a particular product specifies 2× fullness for a 200 cm pole:
200 × 2 = 400 cm total flat curtain width
But do not automatically use 2× for every curtain.
Heading construction, fabric, desired appearance and manufacturer specification can all alter the appropriate ratio. Current fullness recommendations vary substantially between products and headings.
Fixed pinch pleats and some wave curtains are especially important exceptions because their finished width may already be built into the construction.
How to Read Ready-Made Curtain Sizes
Ready-made curtains commonly use a format such as:
WIDTH × DROP
or:
WIDTH × LENGTH
The difficult part is determining what the width actually represents.
It could mean:
- One curtain panel.
- Both panels combined.
- Flat ungathered width.
- A product-specific finished coverage measurement.
For example, current John Lewis ready-made curtain listings often specify that the displayed width describes one flat panel, with two panels included in the pack. IKEA similarly states for some pair products that the dimensions refer to each curtain.
Never assume another retailer follows the same convention.
Before ordering, answer:
“Is this listed width per curtain or for the whole pair?”
Single Curtain or Pair?
This distinction can completely change the calculation.
If a listing says 168 cm wide each and contains two panels:
168 + 168 = 336 cm total flat width
If 168 cm instead describes the entire pair, you only have half as much material.
The individual product page is therefore more important than a generic sizing rule.
Measuring Width for Made-to-Measure Curtains
Made-to-measure services often simplify the process.
They may ask you for:
- Pole or track width.
- Finished drop.
- Heading choice.
- Single curtain or pair.
They then calculate fullness and construction allowances internally.
For example, Jane Clayton explicitly says its made-to-measure service calculates its allowances from the pole/track measurement, and current Dunelm custom-curtain products similarly request track/pole width and drop.
Do not add your own fullness or sewing allowances unless the supplier tells you to do so.
How to Measure Curtain Length or Drop
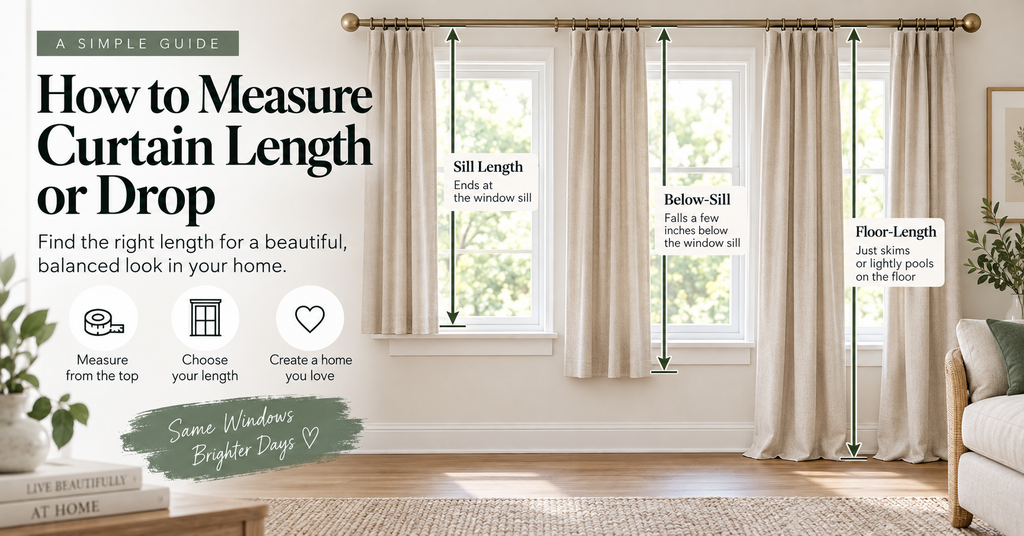
Curtain drop is the vertical distance associated with the finished curtain length.
The key question is:
Where does the measurement start?
That depends on the heading and hardware.
An eyelet curtain does not hang in exactly the same way as a pencil pleat on a ring, and a wave curtain is controlled by its track system.
Decide your heading before taking the final drop measurement.
Where Should Curtains Finish?
There is no single correct curtain length.
Sill Length
Short curtains can work where a desk, bed, worktop or other furniture sits under the window.
Current John Lewis guidance uses a small clearance above the sill rather than having the hem rub on it, but treat exact clearance as a design/product recommendation rather than a universal rule.
Below the Sill
A below-sill curtain provides more visual coverage while remaining shorter than floor length.
Before choosing the hem position, check:
- Radiators.
- Furniture.
- Deep projecting sills.
- Heater controls.
- Anything that would obstruct the curtain.
Floor-Length Curtains
Four common visual approaches are:
Floating: small clearance from the floor.
Kissing: the curtain appears to meet the floor.
Breaking: a little extra length reaches the floor.
Puddling: substantial intentional excess fabric rests on the floor.
Floating or just-touching curtains tend to be easier to clean and move. Puddling is intentionally decorative and involves more floor contact.
Why You Should Measure the Drop in Three Places
Measure vertically at:
left → centre → right
Floors, poles, tracks and window sills are not always perfectly level.
Jane Clayton specifically recommends measuring the finished length at all three positions.
Do not automatically use the shortest measurement in every situation. Instead, choose the finished length according to your intended floor clearance and the supplier’s instructions.
How to Measure for Eyelet Curtains
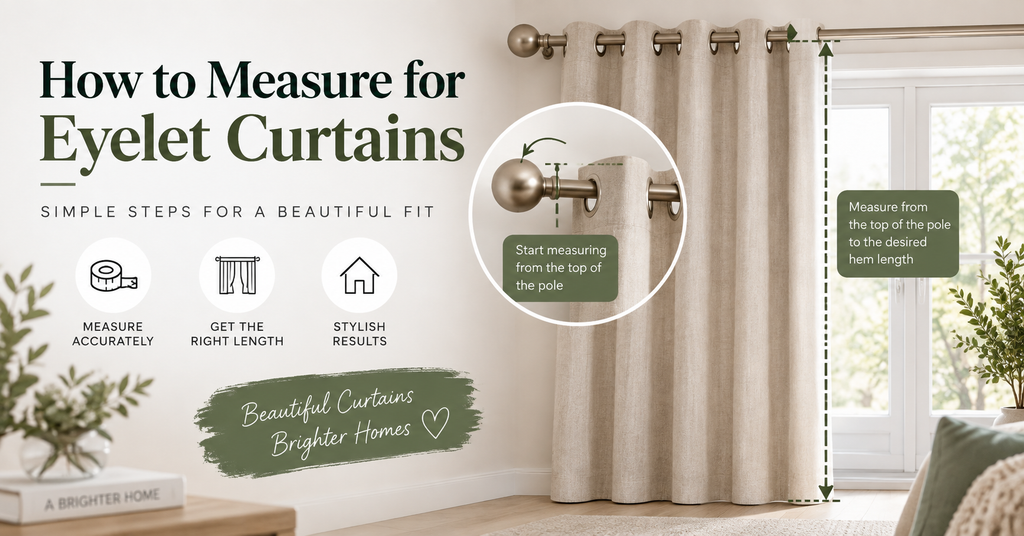
Eyelet—or grommet—curtains slide directly over a pole.
A common approach is to measure from the top of the pole to the intended hem.
However, some curtain fabric sits above the eyelet opening.
The exact amount depends on construction.
Jane Clayton and John Lewis currently use 3.5 cm in their own systems, but this is a supplier-specific construction value rather than a universal eyelet allowance.
For ready-made eyelet curtains, check how the listed finished drop is defined.
How to Measure for Pencil Pleat Curtains
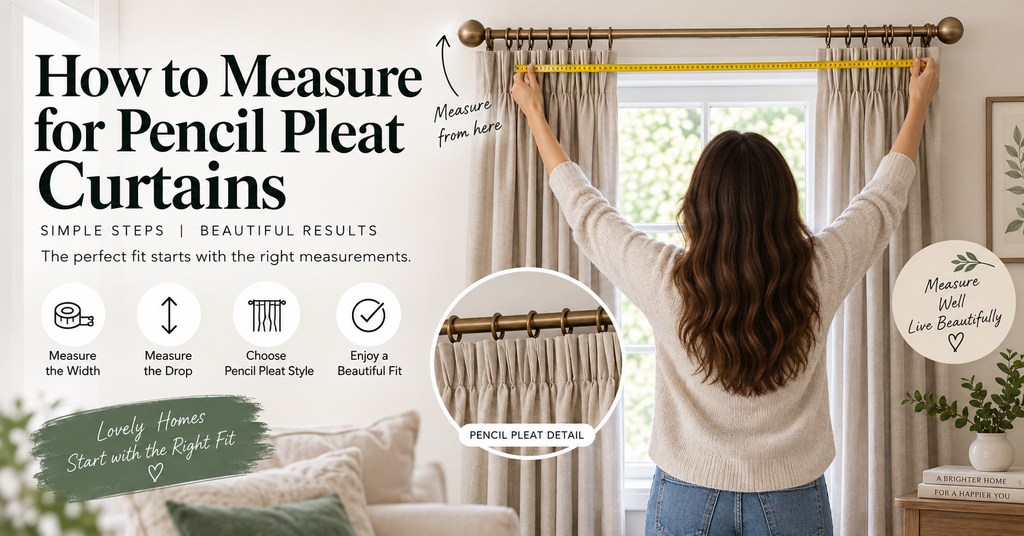
Pencil pleats can work with a track or a pole with rings.
With a pole, the curtain often hangs from hooks attached to the eyes beneath the rings. John Lewis currently instructs customers to measure from that ring eye for its pencil-pleat system.
With a track, your reference may be the track, glider or hook position depending on the product.
Pencil-pleat tape may also offer more than one hook position, altering where the curtain top sits.
Always check the manufacturer’s heading instructions.
How to Measure Pinch Pleat Curtains
Pinch pleats are generally more structured than pencil pleats.
They usually attach through hooks to track gliders or pole rings.
Many made-to-measure pinch-pleat products are manufactured to a fixed finished width. John Lewis, for instance, describes its pinch-pleat curtains as arriving at the ordered width.
That means you should not automatically calculate another fullness multiplier and gather them like pencil pleats.
How to Measure Tab-Top Curtains
Tab-top curtains loop around a pole.
Measure according to the manufacturer’s stated reference point because the dimensions of the tabs affect the finished visual position.
Jane Clayton’s own made-to-measure process incorporates the pole diameter when calculating finished tab-top length, illustrating why one generic tab-top rule is unreliable across different products.
How to Measure Wave Curtains
Wave or ripple curtains rely on a coordinated system:
- Track.
- Glider spacing.
- Heading tape.
- Fold depth.
- Stack-back.
- Specified fullness.
Use the measurements supplied by the track/curtain system rather than applying a generic fullness multiplier.
How Wide Should a Curtain Pole Be?
When installing new hardware, extending the pole beyond the window allows the curtains to stack away from more of the glass and gives additional coverage at the sides.
Current UK guides commonly fall somewhere around 15–30 cm beyond each side. John Lewis currently suggests roughly 15–20 cm each side, while another specialist guide suggests 15–30 cm.
Treat this as a planning range, not a building rule.
Available width may be restricted by:
- Corners.
- Cabinets.
- Radiators.
- Adjacent windows.
- Wall width.
- Bracket positions.
How High Should the Pole Be?
There is similar variation vertically.
John Lewis currently suggests roughly 10–15 cm above the window, whereas Jane Clayton’s typical-window recommendation starts at about 8 cm.
The best position also depends on ceiling height, mouldings, frame details, bracket requirements and curtain heading.
“Hang them high and wide” is a design principle—not an exact measurement rule.
How to Measure for Curtains Without a Pole or Track
If your hardware is not installed:
- Choose pole or track.
- Choose its horizontal position.
- Decide how far it should extend beyond the window.
- Decide the mounting height.
- Check brackets and wall clearance.
- Decide your heading.
- Mark the intended hardware position.
- Use that planned position to estimate width and drop.
Where possible, install the hardware before placing a non-returnable custom order.
How Do Radiators Affect Curtain Length?
A radiator below a window can make floor-length curtains impractical.
Possible arrangements include:
- Sill-length curtains.
- Curtains ending below the sill but above the radiator.
- Floor-length curtains only where the radiator/heater installation makes that arrangement suitable.
Avoid placing fabric where it conflicts with the heater’s required clearances, vents or controls. Follow the heater manufacturer’s instructions where clearance is uncertain.
Furniture, Deep Sills and Wall Projections
Before choosing the drop, check whether a sofa, bed, desk, cabinet or window seat will stop the curtains hanging naturally.
Deep window sills and protruding skirting/baseboards can also push a curtain outward.
The aim is to let curtains open, close and hang without unintended bunching.
Bay and Corner Windows
Do not reduce a bay window to one straight wall-to-wall measurement.
Bay systems can include bent tracks, corner joints or multiple pole sections. Measure the actual path along which the curtain will travel.
For a difficult bay, professional measuring can be worthwhile—particularly for a non-returnable made-to-measure order.
Measuring Curtains for Patio or French Doors
Door curtains need extra planning because they are moved more frequently.
Consider:
- Full opening width.
- Door handles.
- Opening direction.
- Stack-back.
- Single curtain versus pair.
- Floor clearance.
- Ease of daily movement.
Measure the hardware covering the full required opening rather than applying the dimensions of a small window.
What About Blackout Curtains?
A blackout fabric alone does not eliminate every potential light gap.
Side gaps, top gaps and a centre opening can still admit light. IKEA’s current blackout guidance recommends overlapping the window area at the sides and positioning the curtains to minimise gaps.
If light control is a priority, hardware width, centre overlap and side coverage deserve as much attention as fabric type.
How to Turn Your Measurements Into a Curtain Size
For ready-made curtains:
- Record usable pole/track width.
- Check the heading or product’s required coverage/fullness.
- Work out the total flat width where required.
- Check whether the listed width is per panel or pair.
- Choose the nearest appropriate available drop.
- Verify your calculation against the manufacturer’s size guide.
For made-to-measure curtains, enter the measurements exactly in the format requested by that supplier rather than adapting a generic formula.
Common Curtain Measuring Mistakes
The most common errors are:
- Measuring only the window glass.
- Including pole finials.
- Confusing pole width with flat curtain width.
- Assuming every heading uses 2× fullness.
- Assuming listed width means the same thing at every retailer.
- Confusing pair width with per-panel width.
- Measuring the drop from the wrong attachment point.
- Treating a supplier-specific eyelet allowance as universal.
- Measuring the floor in only one place.
- Ignoring radiators or furniture.
- Ordering custom curtains before planning the hardware.
- Mixing inches and centimetres.
- Adding sewing allowances to a finished made-to-measure order.
- Assuming two apparently identical windows have identical dimensions.
Final Measurement Checklist
Before pressing “order,” verify:
□ Pole or track type
□ Usable hardware width
□ Finials excluded
□ Heading confirmed
□ Single curtain or pair confirmed
□ Width convention checked
□ Fullness/coverage requirement checked
□ Left drop measured
□ Centre drop measured
□ Right drop measured
□ Final hem position chosen
□ Furniture and radiator clearance checked
□ Units consistent
□ Manufacturer’s size guide checked
□ Measurements taken twice
One inch equals exactly 2.54 cm, so avoid switching casually between rounded imperial and metric values when accuracy matters.